
Fitting an ARB Awning

I think by now we all know the benefits of having an awning attached to the side of our 4x4 - being able to comfortably sit under a canopy whether it’s raining, snowing or protection from the blazing sun, they’re a great accessory that will multiply your living space in a matter of seconds.
I’ve been after one for quite a while, and when ARB offered to send me one of their 2,000mm x 2,500mm awnings with built-in LED light to review, I of course said yes.
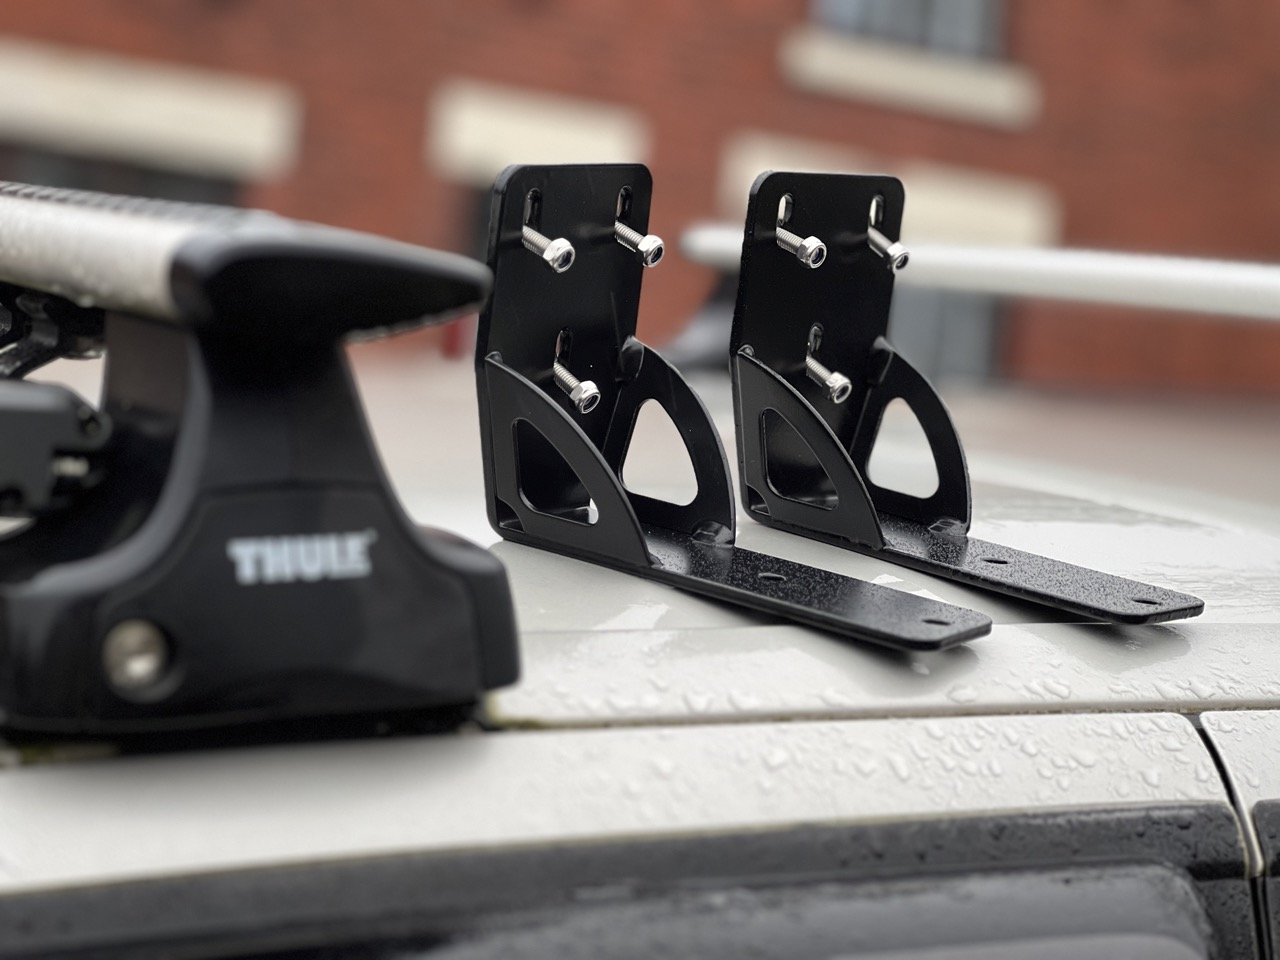
My only concern was how it would fit onto my Thule Wingbars, but ARB have thought of this, and available separately are a selection of brackets for different racks and bars. The pair I required was their 50mm bracket with gusset that comes with 6 nuts ’n’ bolts that secure it to the awning.
It was up to me to source the fasteners that attach them to the Thule bars. I could have gone for some square T- bolts, but I decided instead to make life slightly more difficult for myself and ordered some sliding T-Slot nuts, as I think they’re called.
I also decided to add some thick rubber washers onto the Allen socket headed bolts, as I figured a degree of flexibility would be nice in case it gets attacked by a passing tree whilst ‘laning. It might be a good thing, I’ll see how it goes.
Once the brackets were in place I slid the 6 bolts through the channels on the back of awning, and after a bit of fiddling I shored up all 6 bolts into the holes on the brackets. This is better with two people, but, as Muddy Madam is suffering with a frozen shoulder, I managed to do it whilst holding the entire awning up in one hand. It was a bit awkward, but manageable if you’re on your own, though I felt it the day after!


After patting the awning a couple of times, I confidently said out loud that it wasn’t going anywhere. I jumped in and headed out for a quick spin, up and down a fast dual carriageway not far from Muddy Towers, to see if it had any adverse affects - there weren’t any, not even a whistle. Next was to open it up to make sure everything was okay - actually, to make sure I knew what I was doing.
I’ve watched loads of videos on YouTube, so I had a good idea of how to open it up, and on my first attempt it was quite straightforward - it would be simpler with two people, but was perfectly manageable for just me. A side note here, I am 6ft 2” with, as Muddy Madam says, gorilla arms, so reaching for all the poles whilst holding the awning up was relatively easy.
The telescopic poles for the sides and legs are lightweight, easy to use and lock into place with a simple twist, and if conditions are a bit windy it comes with four sturdy pegs and guy ropes in a heavy-duty bag.
There’s another bag that contains the lead and control switch for the 1200 lumen built-in LED strip. This clever feature gives you the option of either a cool white mode, amber mode and both white and amber, they’re dimmable, too, which is a nice touch.


My first impression is that it feels sturdy, yet lightweight. The light connector felt awkward to connect, but I’m sure it’ll get easier with use, and the awning sags a bit where the light is, but I’m confident I can get it taut with practise. Other than that I’m really pleased with it and I’m looking forward to getting many year’s worth of use.
I’m writing this ten minutes after I fitted it to Deux Smurf as Muddy Madam is demanding it for this very mag, so by the time you’re reading this I will have used it out in the wilds, so if anything else crops up, I'll be sure to let you know.
Where to buy:
Awning: £405.24 - https://www.arb4x4.co.uk/arb-awning-with-light-installed-2000mm-x-2500mm
Bracket: £19.43 each - https://www.arb4x4.co.uk/arb-awning-bracket-50mm-with-gusset-xcsa813402
Roll-in Spring T-Nuts: £5.99 - https://amzn.to/48a38zM
